Hướng dẫn cấu hình MySQL Master-Master Replication
I. Giới thiệu giải pháp
Lưu ý: thiết lập này mang lại một số vấn đề tiềm ẩn khi thay đổi dữ liệu đang xảy ra trên cả hai nodes. Nó có thể gặp vấn đề nếu có table với các trường auto_increment. Nếu cả hai máy chủ đang chèn hoặc cập nhật trong cùng một table, việc sao chép sẽ bị hỏng trên một máy chủ do lỗi “duplicate entry“. Để giải quyết vấn đề này, bạn cần thiết lập “auto_increment_increment” và “auto_increment_offset”.
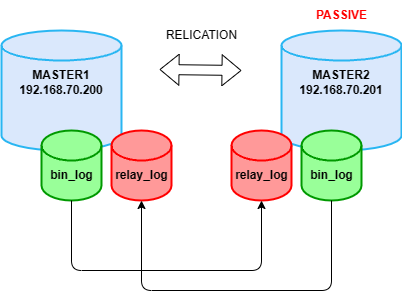
Trong trường hợp này sẽ sử dụng thiếp lập master-master làm bản sao chủ động – thụ động. Nếu đã biết chỉ có một nodes đang thực hiện sửa đổi dữ liệu, bạn có thể tránh được nhiều vấn đề có thể xảy ra. Trong trường hợp dữ liệu chuyển đổi dự phòng, “slave” có thể dễ dàng được đưa lên làm dữ liệu chính(master). Sửa đổi dữ liệu được tự động sao chép sang nodes không thành công khi nó sao lưu.
Mô hình
II. Chuẩn bị
Ở đây ta cần có hai máy chủ đã cài đặt sẵn MySQL có cùng phiên bản để cấu hình. Trong bài hướng dẫn này, Long Vân sử dụng 2 máy chủ MySQL được thiết lập như sau:
- Hệ điều hành: Ubuntu 22.04
- Cơ sở dữ liệu: MySQL 8.0.36
III. Cấu hình
Cài đặt MySQL (trên 2 máy chủ)
$ wget https://dev.mysql.com/get/mysql-apt-config_0.8.29-1_all.deb
$ sudo dpkg -i mysql-apt-config_0.8.29-1_all.deb
$ apt-cache search mysql-server
$ sudo apt install mysql-server-8.0 -y
Dừng MySQL trên cả hai máy chủ:
sudo systemctl stop mysql.service MASTER1 – (Bước 1. Cấu hình trên máy chủ đầu tiên)
Chỉnh sửa tệp cấu hình /etc/mysql/mysql.conf.d/mysqld.cnf
#bind-address           = 127.0.0.1
server-id = 200
report_host = master1
log_bin = /var/log/mysql/mariadb-bin
log_bin_index = /var/log/mysql/mariadb-bin.index
relay_log = /var/log/mysql/relay-bin
relay_log_index = /var/log/mysql/relay-bin.index
#replicate-do-db = test_db
auto_increment_increment = 5
auto_increment_offset = 1
#bind-address = 127.0.0.1
Theo mặc định, MySQL chỉ cho phép các kết nối từ máy chủ cục bộ. Chúng ta cần xóa hoặc # dòng này lại để cho phép kết nối từ các máy chủ khác. Mục này rất quan trọng để mở rộng kết nối để hoạt động.
server-id = 200
report_host = master1
Thiết lập ID duy nhất cho máy chủ. Ở hướng dẫn này sẽ thiết lập sử dụng chữ số cuối của địa chỉ IP. Tùy chọn, ta có thể thiết lập tham số report_host cho các máy chủ có thể giao tiếp lẫn nhau thông qua hostnames đã thiết đặt.
log_bin = /var/log/mysql/mariadb-bin
log_bin_index = /var/log/mysql/mariadb-bin.index
Cho phép ghi nhật ký nhị phân (Enable binary logging).
relay_log = /var/log/mysql/relay-bin
relay_log_index = /var/log/mysql/relay-bin.index
Cho phép tạo tệp relay_log. Các Events trong các nhật ký nhị phân(master’s binary log) sẽ được ghi vào slave relay log.
replicate-do-db = testdb
Với tùy chỉnh này, ta có thể thiết lập với MySQL cơ sở dữ liệu nào cần sao chép. Tham số này là tùy chọn.
Tiếp đến ta cần khởi động máy chủ MySQL
sudo systemctl start mysql.service Đăng nhập vào root và tạo người dùng được sử dụng để sao chép dữ liệu giữa các máy chủ. Cấp quyền thích hợp cho người dùng.
$ sudo mysql -u root -p
mysql> create user 'replusr'@'%' identified by 'replusr';
mysql> grant replication slave on *.* to 'replusr'@'%';
Bước cuối cùng, kiểm tra thông tin trạng thái tệp binary log vì chúng ta sẽ sử dụng thông tin này để bắt đầu sao chép(replication) trên một máy chủ(node) khác.
mysql> show master status;
+--------------------+----------+--------------+------------------+-------------------+
| File               | Position | Binlog_Do_DB | Binlog_Ignore_DB | Executed_Gtid_Set |
+--------------------+----------+--------------+------------------+-------------------+
| mariadb-bin.000017 |      611 |              |                  |                   |
+--------------------+----------+--------------+------------------+-------------------+
MASTER2 (Bước 2. Cấu hình trên máy chủ thứ hai)
Chỉnh sửa tệp cấu hình /etc/mysql/mysql.conf.d/mysqld.cnf
#bind-address           = 127.0.0.1
server-id = 201
report_host = master2
log_bin = /var/log/mysql/mariadb-bin
log_bin_index = /var/log/mysql/mariadb-bin.index
relay_log = /var/log/mysql/relay-bin
relay_log_index = /var/log/mysql/relay-bin.index
#replicate-do-db = test_db
auto_increment_increment = 5
auto_increment_offset = 1
Khởi động máy chủ MySQL
sudo systemctl start mysql.service tạo người dùng được sử dụng để sao chép dữ liệu và cấp quyền thích hợp cho người dùng.
$ sudo mysql -u root -p
mysql> create user 'replusr'@'%' identified by 'replusr';
mysql> grant replication slave on *.* to 'replusr'@'%';
Để bắt đầu sao chép, nhập lệnh phía bên dưới
mysql> STOP SLAVE;
mysql> CHANGE MASTER TO MASTER_HOST='master1', MASTER_USER='replusr', MASTER_PASSWORD='replusr', MASTER_LOG_FILE='mariadb-bin.000017', MASTER_LOG_POS=611;
mysql> START SLAVE;
Đối với MASTER_LOG_FILE và MASTER_LOG_POS. Đã sử dụng thông tin từ “show master status” ở đầu tiên.
Kiểm tra thông tin trạng thái của Slave
mysql> SHOW SLAVE STATUS\G
*************************** 1. row ***************************
               Slave_IO_State: Waiting for source to send event
                  Master_Host: master1
                  Master_User: replusr
                  Master_Port: 3306
                Connect_Retry: 60
              Master_Log_File: mariadb-bin.000017
          Read_Master_Log_Pos: 611
               Relay_Log_File: relay-bin.000028
                Relay_Log_Pos: 831
        Relay_Master_Log_File: mariadb-bin.000017
             Slave_IO_Running: Yes
            Slave_SQL_Running: Yes
              Replicate_Do_DB:
          Replicate_Ignore_DB:
           Replicate_Do_Table:
       Replicate_Ignore_Table:
      Replicate_Wild_Do_Table:
  Replicate_Wild_Ignore_Table:
                   Last_Errno: 0
                   Last_Error:
                 Skip_Counter: 0
          Exec_Master_Log_Pos: 611
              Relay_Log_Space: 1206
              Until_Condition: None
               Until_Log_File:
                Until_Log_Pos: 0
           Master_SSL_Allowed: No
           Master_SSL_CA_File:
           Master_SSL_CA_Path:
              Master_SSL_Cert:
            Master_SSL_Cipher:
               Master_SSL_Key:
        Seconds_Behind_Master: 0
Master_SSL_Verify_Server_Cert: No
                Last_IO_Errno: 0
                Last_IO_Error:
               Last_SQL_Errno: 0
               Last_SQL_Error:
  Replicate_Ignore_Server_Ids:
             Master_Server_Id: 200
                  Master_UUID: c7f19e4d-0605-11ef-8f6e-005056a5dd4e
             Master_Info_File: mysql.slave_master_info
                    SQL_Delay: 0
          SQL_Remaining_Delay: NULL
      Slave_SQL_Running_State: Replica has read all relay log; waiting for more updates
           Master_Retry_Count: 86400
                  Master_Bind:
      Last_IO_Error_Timestamp:
     Last_SQL_Error_Timestamp:
               Master_SSL_Crl:
           Master_SSL_Crlpath:
           Retrieved_Gtid_Set:
            Executed_Gtid_Set:
                Auto_Position: 0
         Replicate_Rewrite_DB:
                 Channel_Name:
           Master_TLS_Version:
       Master_public_key_path:
        Get_master_public_key: 0
            Network_Namespace:
Lưu ý Read_Master_Log_Pos và Exec_Master_Log_Pos được đồng bộ hóa, đây là dấu hiệu tốt cho cơ sở dữ liệu của chúng ta đang đồng bộ hóa
Kiểm tra thông tin trạng thái về tệp binary logs của máy chủ MASTER2. Chúng ta sẽ cần thông tin này để bắt đầu sao chép trên máy chủ MASTER1.
mysql> show master status;
+--------------------+----------+--------------+------------------+-------------------+
| File               | Position | Binlog_Do_DB | Binlog_Ignore_DB | Executed_Gtid_Set |
+--------------------+----------+--------------+------------------+-------------------+
| mariadb-bin.000016 |     1498 |              |                  |                   |
+--------------------+----------+--------------+------------------+-------------------+
MASTER1 – (Bước 3. Sao chép dữ liệu từ MASTER2 sang MASTER1)
Bắt đầu replication dữ liệu từ MASTER2 sang MASTER1
mysql> STOP SLAVE;
mysql> CHANGE MASTER TO MASTER_HOST='master2', MASTER_USER='replusr', MASTER_PASSWORD='replusr', MASTER_LOG_FILE='mariadb-bin.000016', MASTER_LOG_POS=1498;
mysql> START SLAVE;
mysql> SHOW SLAVE STATUS\G
*************************** 1. row ***************************
Slave_IO_State: Waiting for source to send event
Master_Host: master2
Master_User: replusr
Master_Port: 3306
Connect_Retry: 60
Master_Log_File: mariadb-bin.000016
Read_Master_Log_Pos: 1498
Relay_Log_File: relay-bin.000030
Relay_Log_Pos: 328
Relay_Master_Log_File: mariadb-bin.000016
Slave_IO_Running: Yes
Slave_SQL_Running: Yes
Replicate_Do_DB: test_db
Replicate_Ignore_DB:
Replicate_Do_Table:
Replicate_Ignore_Table:
Replicate_Wild_Do_Table:
Replicate_Wild_Ignore_Table:
Last_Errno: 0
Last_Error:
Skip_Counter: 0
Exec_Master_Log_Pos: 1498
Relay_Log_Space: 883
Until_Condition: None
Until_Log_File:
Until_Log_Pos: 0
Master_SSL_Allowed: No
Master_SSL_CA_File:
Master_SSL_CA_Path:
Master_SSL_Cert:
Master_SSL_Cipher:
Master_SSL_Key:
Seconds_Behind_Master: 0
Master_SSL_Verify_Server_Cert: No
Last_IO_Errno: 0
Last_IO_Error:
Last_SQL_Errno: 0
Last_SQL_Error:
Replicate_Ignore_Server_Ids:
Master_Server_Id: 201
Master_UUID: c0db3da1-0605-11ef-8335-005056a5e4fe
Master_Info_File: mysql.slave_master_info
SQL_Delay: 0
SQL_Remaining_Delay: NULL
Slave_SQL_Running_State: Replica has read all relay log; waiting for more updates
Master_Retry_Count: 86400
Master_Bind:
Last_IO_Error_Timestamp:
Last_SQL_Error_Timestamp:
Master_SSL_Crl:
Master_SSL_Crlpath:
Retrieved_Gtid_Set:
Executed_Gtid_Set:
Auto_Position: 0
Replicate_Rewrite_DB:
Channel_Name:
Master_TLS_Version:
Master_public_key_path:
Get_master_public_key: 0
Network_Namespace: Mọi thứ hoạt động tốt.
Hãy thử nghiệm tạo bảng và chèn một số hàng để kiểm tra bản sao.
Ở thử nghiệm này mình sẽ có thí dụ đơn giản ở server MASTER1 sẽ triển khai một trang cơ bản wordpress và thay đổi home, siteurl trong bảng wp_options
MASTER1 – (Bước 4. Kiểm tra thử thay đổi dữ liệu trên máy chủ MASTER1)
mysql> use test_db;
Reading table information for completion of table and column names
You can turn off this feature to get a quicker startup with -A

Database changed
mysql> SELECT option_name, option_value FROM wp_options WHERE option_name IN ('siteurl', 'home');
+-------------+-----------------+
| option_name | option_value    |
+-------------+-----------------+
| home        | http://test.com |
| siteurl     | http://test.com |
+-------------+-----------------+
2 rows in set (0.00 sec)

mysql> UPDATE wp_options SET option_value = 'http://test123.com' WHERE option_name IN ('siteurl', 'home');
Query OK, 2 rows affected (0.01 sec)
Rows matched: 2  Changed: 2  Warnings: 0
MASTER2 – (Bước 5. Kiểm tra dữ liệu trên cơ sở dữ liệu của MASTER2)
mysql> use test_db;
Reading table information for completion of table and column names
You can turn off this feature to get a quicker startup with -A

Database changed
mysql> SELECT option_name, option_value FROM wp_options WHERE option_name IN ('siteurl', 'home');
+-------------+--------------------+
| option_name | option_value       |
+-------------+--------------------+
| home        | http://test123.com |
| siteurl     | http://test123.com |
+-------------+--------------------+
2 rows in set (0.00 sec)
Ta có thể thấy nội dung bảng đã được sao chép thành công.
Nếu có sự cố ở MASTER1, trong khi đó MASTER2 vẫn hoạt động và ghi dữ liệu bình thường sẽ có thông báo lỗi Last_IO_Error trong lúc MASTER1 không hoạt động.
Sau đó khởi động lại MASTER1. Máy chủ MySQL và replication MySQL sẽ tự động kích hoạt và đồng bộ dữ liệu MASTER1 theo kịp với MASTER2.
Như vậy Long Vân đã hoàn thành hướng dẫn cấu hình MySQL Master-Master Replication, chúc Quý Khách thành công!